ESP32 read PT1000/PT100 temperature sensor values
In this article, it will introduce how to read the temperature values from PT1000 with ESP32.
The principle of PT1000 measure temperature
PT1000 sensors are temperature sensors that use the principle of resistance to measure temperature. These sensors have a resistor with a resistance that changes with temperature. The resistance of the PT1000 sensor increases as the temperature increases, and decreases as the temperature decreases.
About the name
The name of the PT1000 temperature sensor, as below:
- Pt stands for Platinum, which is the material used in the sensor.
- 1000 represents the resistance at 0°C.
Thus, PT1000 indicates a platinum-based sensor with a resistance of 1000 ohms at 0°C.
Similarly, PT100 and PT500 sensors have resistances of 100 and 500 ohms at 0°C, respectively.
Although this article is discussing the PT1000 temperature sensor, the principles of measurment can apply to other types of analog sensors as well. Because we are measuring the voltage across the "resistor", then converting this voltage to a resistance, and finally to a physical attribute (e.g. temperature).
I think that meathod is also applicable to other types of analog sensors measurement:
- If we understand the principles of PT1000 temperature sensor measurement, we can use it to measure any analog sensor.
- And if we increase the accuracy of the PT1000 temperature sensor measurement, we can apply it to other types of analog sensors as well.
Resistance values at different temperature
IEC 60751 provides the coefficients for the Callendar-Van Dusen equation, which is used to calculate the resistance of platinum RTDs over a specified temperature range.
Callendar-Van Dusen Equation
For temperatures between -200°C and 0°C:
For temperatures between 0°C and 850°C:
Where:
- is the resistance at temperature (in °C).
- is the resistance at 0°C (e.g., 1000 ohms for PT1000).
- , , and are constants. is only used for temperatures below 0°C.
Coefficients for Platinum RTDs (according to IEC 60751):
Plot the temperature resistance relationship shows as below:
Note:
So if we can measure the resistance of the PT1000 sensor, the we can calculate the temperature using the equation.
But the main problem is how to "precisely" measure the resistance of the PT1000 sensor.
We will introduce different methods to measure the resistance of the PT1000 sensor. It will increase the accuracy step by step. By this series of methods, you can choose the most suitable one for your application. And these types of methods are also applicable to other types of analog sensors measurement.
- Measure resistance with ESP32 ADC. (this article)
- Increase accuracy with 3 wire connection.
- Increase accuracy with 4 wire connection.
- Increase accuracy with a Wheatstone bridge.
- Increase accuracy with an ADC with a higher resolution.
Measure resistance with ESP32 ADC
Let's start from the most simple method, measure the resistance of the PT1000 sensor with ESP32 ADC.
The ADC (analog-to-digital converter) on the ESP32 can be used to measure the voltage on an analog input pin. The ADC can be configured to measure the voltage on the PT1000 sensor, and the resulting voltage can be used to calculate the resistance of the sensor.
Hardware connection
To read PT1000 analog values and convert them to temperature with an ESP32, you can follow these steps:
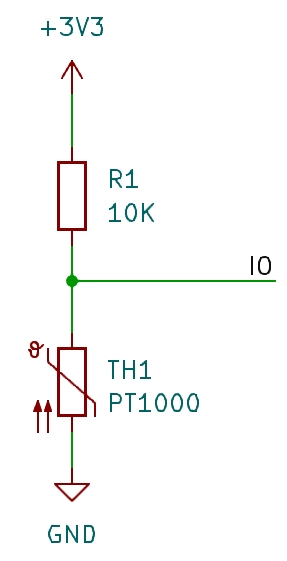
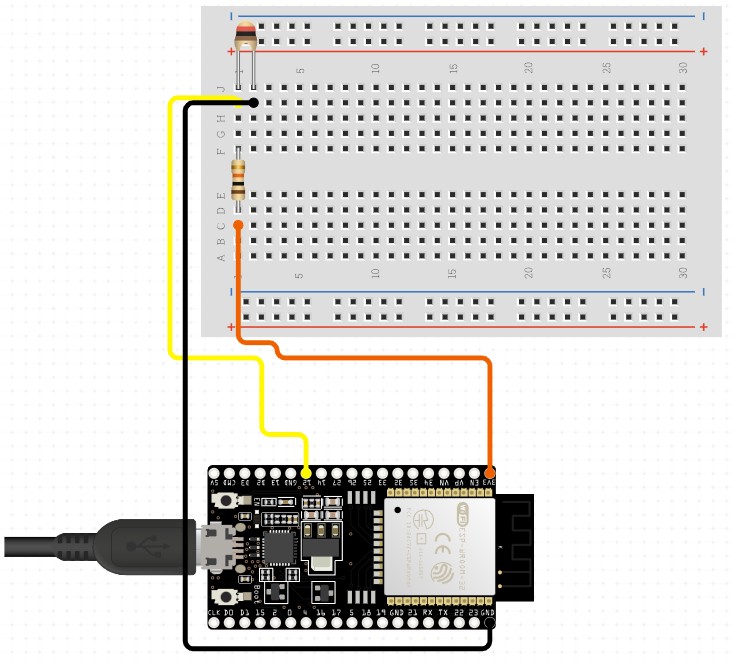
Inorder to measure the PT1000 resistance values by ESP32 analog GPIO, we can connect the circuit as below:
- Connect a precise 100Ω resistor (referred to as ) in series with the PT100 resistor.
- Connect one end of the circuit to the 5V output of the Arduino and the other end to ESP32 GND.
- Connect the midpoint between the two resistors to an ESP32 analog input (e.g., A0).
The words maybe to hard to understanding, ref to below picture about the connection.


The voltage can be expressed as:
By measuring , we can calculate the resistance of the PT1000 .
To calculate the resistance from the measured voltage , you can rearrange the voltage divider formula:
Here:
- is the resistance of the PT1000 sensor at certain temperature (in ohms).
- is the known reference resistor (e.g., 1000Ω).
- is the measured voltage at the midpoint between and .
Use the analogRead() function to read the analog value from the PT1000 sensor. This function returns a value between 0 and 4095, corresponding to the voltage on the analog input pin.
The sample code:
#define PT1000_ANALOG_PIN 25   // Analog input pin for PT1000 sensor (GPIO25)
#define PT1000_R_REF 1000.0     // Reference resistance for PT1000 sensor at 0°C (in ohms)
#define V_SUPPLY 3.3            // Supply voltage to the voltage divider

// Lookup table for resistance-to-temperature conversion
float temperatureTable[] = {-40.0, -20.0, 0.0, 20.0, 40.0, 60.0, 80.0, 100.0, 120.0}; // Corresponding temperature values
float resistanceTable[] = {842.7, 921.6, 1000, 1077.9, 1155.4, 1232.4, 1309, 1385.1, 1460.7}; // Add more values as needed

// Linear interpolation function
float interpolate(float x, float xTable[], float yTable[], int size) {
  for (int i = 1; i < size; i++) {
    if (x <= xTable[i]) {
      // Linear interpolation
      float x0 = xTable[i - 1];
      float x1 = xTable[i];
      float y0 = yTable[i - 1];
      float y1 = yTable[i];
      return y0 + (y1 - y0) * (x - x0) / (x1 - x0);
    }
  }
  // Extrapolation if x is outside the range of the table
  return yTable[size - 1];
}

void setup() {
  Serial.begin(115200);  // Initialize serial communication
  pinMode(PT1000_ANALOG_PIN, INPUT);  // Set GPIO25 as input
}

void loop() {
  // Read analog value from PT1000 sensor
  int analogValue = analogRead(PT1000_ANALOG_PIN);

  // Convert analog value to voltage
  float vOut = analogValue * (V_SUPPLY / 4095.0);  // Adjust for ESP32 ADC resolution (12-bit)

  // Calculate PT1000 resistance
  float resistance = PT1000_R_REF * vOut / (V_SUPPLY - vOut);

  // Convert resistance to temperature using linear interpolation
  float temperature = interpolate(resistance, resistanceTable, temperatureTable, sizeof(resistanceTable) / sizeof(resistanceTable[0]));

  // Print temperature to serial monitor
  Serial.print("Temperature: ");
  Serial.print(temperature);
  Serial.println("°C");

  // Wait for 1 second before taking another reading
  delay(1000);
}
