Flash or Upload Configure File to ESP32
NEKO asked me how to flash IO pin configure to ESP32 on Youtube, in this article, I will introduce how to configure ESP32 by a file.
We can use ESP32 SPIFFS to store and read the configure file. SPIFFS (SPI Flash File System) allows you to use the flash memory of the ESP32 to store files, providing a way to read and write data in a structured manner similar to how files are managed on a traditional file system.
To save the ESP32 configuration file to a .txt file and be able to upload it to the ESP32, follow these steps:
- Create a Configuration File.
- Add code in ESP32 program to read the configuration file.
- Include or upload the configuration file to the ESP32 by PlatformIO.
Detailed Steps
Step 1: Create the Configuration File
Create a file named config.txt and include the following content:
PIN_LED=2
PIN_BUTTON=4
Step 2: Write ESP32 Code to Read the Configuration File
In your ESP32 code, add the code to read the configuration file and parse its content. For example:
#include <Arduino.h>
#include <FS.h>
#include <SPIFFS.h>

int pinLED;
int pinButton;

void readConfigFile() {
    if(!SPIFFS.begin(true)){
        Serial.println("An error has occurred while mounting SPIFFS");
        return;
    }

    File file = SPIFFS.open("/config.txt", "r");
    if(!file){
        Serial.println("Failed to open file for reading");
        return;
    }

    while(file.available()){
        String line = file.readStringUntil('\n');
        int separatorIndex = line.indexOf('=');
        if (separatorIndex == -1) continue;

        String key = line.substring(0, separatorIndex);
        String value = line.substring(separatorIndex + 1);

        if (key == "PIN_LED") {
            pinLED = value.toInt();
        } else if (key == "PIN_BUTTON") {
            pinButton = value.toInt();
        }
    }
    file.close();
}

void setup() {
    Serial.begin(115200);

    readConfigFile();

    pinMode(pinLED, OUTPUT);
    pinMode(pinButton, INPUT);
}

void loop() {
    // Your main code here
}
In this example, it read the content in config.txt, and split each row string to pin define. You can change the code how to deal with the content as you need.
Step 3: Upload the Configuration File
Then we can upload/flash the configure file to ESP32 during PlatformIO flash code, or upload it at any time as needed.
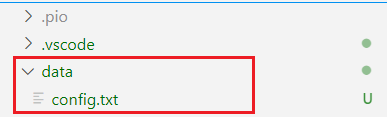
In the root directory of your PlatformIO project, create a folder named data and place the config.txt file inside it.
Add SPIFFS support in the platformio.ini file:
[env:esp32]
platform = espressif32
board = esp32dev
framework = arduino
monitor_speed = 115200
build_flags =
    -D CONFIG_SPIFFS_SIZE=1500000
Then flash code to ESP32 by the tools at the bottom toolbar. Or the side tools on the left panel.

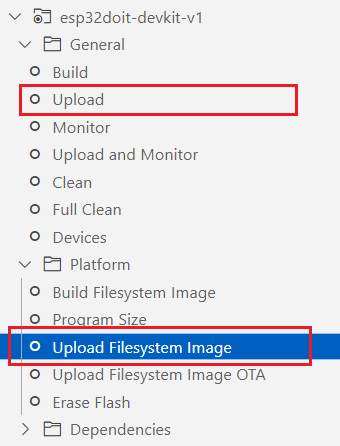
The first one Upload is upload compiled codes, the second one Upload Filessystem Image will upload files under data folder to ESP32 SPIFFS.
Or use the following command to upload the SPIFFS file system:
pio run --target uploadfs